Time for another update.
Having watched a guide on YouTube which helped me with a lot of these guides myself, I can successfully confirm that there is another way to perform an 'All-Proof Conversion' on a vehicle. The difference here is that this is actually repeatable if you so desire.
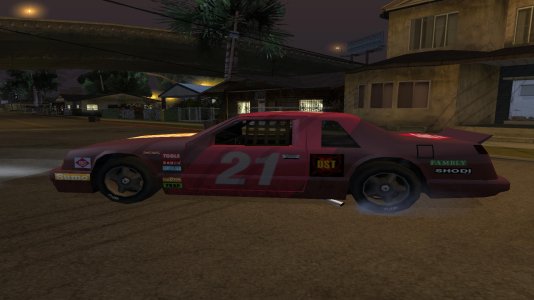
While not exactly useful as a whole considering that there are more (and some even easier) All-Proof vehicles to obtain, but I'll be posting it here anyway, in case you wish to convert a specific vehicle model into an All-Proof one, like a Police Cruiser or, in the below example, a Hotring Racer.
How to do this:
What is needed:
1. Storage space in the Johnson House with the vehicle of your choice parked in there at least, or if needed, just take it from its spawn point or jack it. Be mindful of police attention if you try this on a Police Cruiser.
2. Body Armor
3. Minigun, Assault Rifle (such as M4) or Sawn-off Shotgun with plenty of ammo (Hitman skill recommended)
4. Infinite Sprint is also recommended, just in case.
5. All Oysters Collected (50 total) is also recommended.
The Steps:
1. First, head into the Map within the main menu during gameplay and place a Map/Target Marker on the El Corona/Verdant Bluffs Safehouse. This is important for later.
2. Proceed with the mission Los Desperados and play it as normal, until the Alley Shootout where Hazer (an Azteca gang member) is SCRIPTED to be shot down (but NOT killed; that would fail the mission!).
3. During said shootout, rush through the alley towards the street where the El Corona/Verdant Bluffs Safehouse is, grab a Blade that is parked near one of the early houses and drive it to one of the Vagos members attacking. Do NOT kill him, but instead, bump into him softly so he falls over, then use the Blade to pin him down to the ground.
4. Take out the remaining Vagos members and press H to disband your GSF Allies (if they're not shot down already, or shoot them down yourself if you have to).
5. Make your way towards the TransFender shop in Temple. As there are no 'mission-vital' vehicles about, you can touch only ONE other vehicle after placing the Blade (or a nearby Voodoo) on top of the remaining Vagos member, then you have about 3 minutes to get to that TransFender before said vehicle disappears (which frees the Vagos Member in the process) and the attempt fails.
6. When done successfully, the next phase starts, but in a 'reduced' landscape akin to the Black Hell from the Interiors Universe. Shoot Cesar down which fails the mission, then head for the El Corona/Verdant Bluffs Safehouse to restore normal game vision. This is where the Map/Target Marker comes in to guide you to that location; it may require some fiddling about, but when you see the screen fade out from entering the safehouse and vision returns to normal, you've succeeded. Exit the Safehouse.
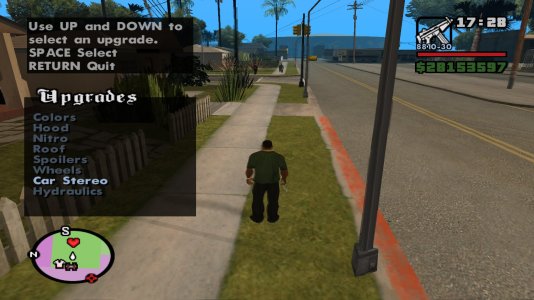
7. You now should have a mod menu on screen while you can move about. DO NOT ENTER ANY VEHICLES! Head on foot to Denise Robison's House.

(This is what you should be seeing)
8. When arriving at Denise's House, take her on a date. If the progress is low enough still, she'll only ask for something to eat. Head on foot to the Green Bottles Bar, which is quite close by. Enter the bar for a successful date.
9. After the date is over, jack a vehicle and drive IN REVERSE to Denise's House. DO NOT PUSH ACCELLERATE AS THAT WILL ENGAGE THE MOD MENU!
10. When asked for 'coffee', spam the Exit Vehicle button to exit the Mod Menu. You should reappear at TransFender now.
11. Exit TransFender and head to any spawn point you remember or head to any safehouse of your choosing to get the vehicle you wish to convert into All Proof.
12. When in the vehicle of choice (such as the Hotring Racer mentioned above), drive to Glen Park and into the water of the pond to let it submerge (DO NOT EXIT THE VEHICLE!). When sufficiently submerged, press 'Y' for yes to engage in 'coffee'.
13. When that is over, you should reappear in your vehicle in the Glen Park Pond. Exit the Vehicle and use the Sawn Off Shotgun to push the vehicle out of the pond.
14. Once out of the pond, just drive it to the safehouse (or a Pay and Spray if you want to change colors and fix any flat tires along the way first before doing so), then store it in the garage, confirm it just in case, and then Save the Game.
When done right, you should have another vehicle converted to All Proof status.
Having watched a guide on YouTube which helped me with a lot of these guides myself, I can successfully confirm that there is another way to perform an 'All-Proof Conversion' on a vehicle. The difference here is that this is actually repeatable if you so desire.
While not exactly useful as a whole considering that there are more (and some even easier) All-Proof vehicles to obtain, but I'll be posting it here anyway, in case you wish to convert a specific vehicle model into an All-Proof one, like a Police Cruiser or, in the below example, a Hotring Racer.

How to do this:
What is needed:
1. Storage space in the Johnson House with the vehicle of your choice parked in there at least, or if needed, just take it from its spawn point or jack it. Be mindful of police attention if you try this on a Police Cruiser.
2. Body Armor
3. Minigun, Assault Rifle (such as M4) or Sawn-off Shotgun with plenty of ammo (Hitman skill recommended)
4. Infinite Sprint is also recommended, just in case.
5. All Oysters Collected (50 total) is also recommended.
The Steps:
1. First, head into the Map within the main menu during gameplay and place a Map/Target Marker on the El Corona/Verdant Bluffs Safehouse. This is important for later.
2. Proceed with the mission Los Desperados and play it as normal, until the Alley Shootout where Hazer (an Azteca gang member) is SCRIPTED to be shot down (but NOT killed; that would fail the mission!).
3. During said shootout, rush through the alley towards the street where the El Corona/Verdant Bluffs Safehouse is, grab a Blade that is parked near one of the early houses and drive it to one of the Vagos members attacking. Do NOT kill him, but instead, bump into him softly so he falls over, then use the Blade to pin him down to the ground.
4. Take out the remaining Vagos members and press H to disband your GSF Allies (if they're not shot down already, or shoot them down yourself if you have to).
5. Make your way towards the TransFender shop in Temple. As there are no 'mission-vital' vehicles about, you can touch only ONE other vehicle after placing the Blade (or a nearby Voodoo) on top of the remaining Vagos member, then you have about 3 minutes to get to that TransFender before said vehicle disappears (which frees the Vagos Member in the process) and the attempt fails.
6. When done successfully, the next phase starts, but in a 'reduced' landscape akin to the Black Hell from the Interiors Universe. Shoot Cesar down which fails the mission, then head for the El Corona/Verdant Bluffs Safehouse to restore normal game vision. This is where the Map/Target Marker comes in to guide you to that location; it may require some fiddling about, but when you see the screen fade out from entering the safehouse and vision returns to normal, you've succeeded. Exit the Safehouse.
7. You now should have a mod menu on screen while you can move about. DO NOT ENTER ANY VEHICLES! Head on foot to Denise Robison's House.

(This is what you should be seeing)
8. When arriving at Denise's House, take her on a date. If the progress is low enough still, she'll only ask for something to eat. Head on foot to the Green Bottles Bar, which is quite close by. Enter the bar for a successful date.
9. After the date is over, jack a vehicle and drive IN REVERSE to Denise's House. DO NOT PUSH ACCELLERATE AS THAT WILL ENGAGE THE MOD MENU!
10. When asked for 'coffee', spam the Exit Vehicle button to exit the Mod Menu. You should reappear at TransFender now.
11. Exit TransFender and head to any spawn point you remember or head to any safehouse of your choosing to get the vehicle you wish to convert into All Proof.
12. When in the vehicle of choice (such as the Hotring Racer mentioned above), drive to Glen Park and into the water of the pond to let it submerge (DO NOT EXIT THE VEHICLE!). When sufficiently submerged, press 'Y' for yes to engage in 'coffee'.
13. When that is over, you should reappear in your vehicle in the Glen Park Pond. Exit the Vehicle and use the Sawn Off Shotgun to push the vehicle out of the pond.
14. Once out of the pond, just drive it to the safehouse (or a Pay and Spray if you want to change colors and fix any flat tires along the way first before doing so), then store it in the garage, confirm it just in case, and then Save the Game.
When done right, you should have another vehicle converted to All Proof status.


